Friday, 23 June 2017

First Web Service in java using Eclipse

Let us start writing the actual RESTful web services with Jersey Framework. Before you start writing your first example using the Jersey Framework, you have to make sure that you have setup your Jersey environment properly as explained in the RESTful Web Services - Environment Setup chapter. Here, I am also assuming that you have a little working knowledge of Eclipse IDE.
So, let us proceed to write a simple Jersey Application which will expose a web service method to display the list of users.
Creating a Java Project

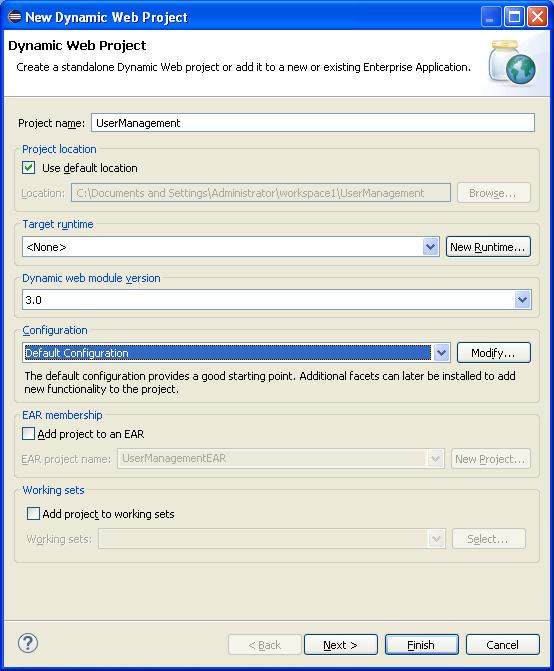
The first step is to create a Dynamic Web Project using Eclipse IDE. Follow the option File → New → Project and finally select the Dynamic Web Project wizard from the wizard list. Now name your project as UserManagement using the wizard window as shown in the following screenshot −
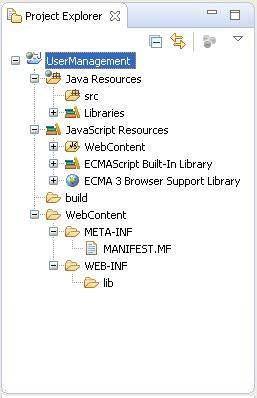
Dynamic Web Project Wizard Once your project is created successfully, you will have the following content in your Project Explorer
Usermanagement Directories

Adding the Required Libraries

As a second step let us add Jersey Framework and its dependencies (libraries) in our project. Copy all jars from following directories of download jersey zip folder in WEB-INF/lib directory of the project.
  • \jaxrs-ri-2.17\jaxrs-ri\api
  • \jaxrs-ri-2.17\jaxrs-ri\ext
  • \jaxrs-ri-2.17\jaxrs-ri\lib
Now, right click on your project name UserManagement and then follow the option available in context menu − Build Path → Configure Build Path to display the Java Build Path window.
Now use Add JARs button available under Libraries tab to add the JARs present in WEBINF/lib directory.

Creating the Source Files

Now let us create the actual source files under the UserManagement project. First we need to create a package called com.tutorialspoint. To do this, right click on src in package explorer section and follow the option − New → Package.
Next we will create UserService.java, User.java,UserDao.java files under the com.tutorialspoint package.
User.java
  

import java.io.Serializable;  
import javax.xml.bind.annotation.XmlElement; 
import javax.xml.bind.annotation.XmlRootElement; 
@XmlRootElement(name = "user") 

public class User implements Serializable {  
   private static final long serialVersionUID = 1L; 
   private int id; 
   private String name; 
   private String profession;  
   public User(){} 
    
   public User(int id, String name, String profession){  
      this.id = id; 
      this.name = name; 
      this.profession = profession; 
   }  
   public int getId() { 
      return id; 
   }  
   @XmlElement 
   public void setId(int id) { 
      this.id = id; 
   } 
   public String getName() { 
      return name; 
   } 
   @XmlElement
   public void setName(String name) { 
      this.name = name; 
   } 
   public String getProfession() { 
      return profession; 
   } 
   @XmlElement 
   public void setProfession(String profession) { 
      this.profession = profession; 
   }   
} 
UserDao.java


import java.io.File; 
import java.io.FileInputStream; 
import java.io.FileNotFoundException;  
import java.io.FileOutputStream; 
import java.io.IOException; 
import java.io.ObjectInputStream; 
import java.io.ObjectOutputStream; 
import java.util.ArrayList; 
import java.util.List;  

public class UserDao { 
   public List<User> getAllUsers(){ 
      
      List<User> userList = null; 
      try { 
         File file = new File("Users.dat"); 
         if (!file.exists()) { 
            User user = new User(1, "Mahesh", "Teacher"); 
            userList = new ArrayList<User>(); 
            userList.add(user); 
            saveUserList(userList); 
         } 
         else{ 
            FileInputStream fis = new FileInputStream(file); 
            ObjectInputStream ois = new ObjectInputStream(fis); 
            userList = (List<User>) ois.readObject(); 
            ois.close(); 
         } 
      } catch (IOException e) { 
         e.printStackTrace(); 
      } catch (ClassNotFoundException e) { 
         e.printStackTrace(); 
      }   
      return userList; 
   } 
   private void saveUserList(List<User> userList){ 
      try { 
         File file = new File("Users.dat"); 
         FileOutputStream fos;  
         fos = new FileOutputStream(file); 
         ObjectOutputStream oos = new ObjectOutputStream(fos); 
         oos.writeObject(userList); 
         oos.close(); 
      } catch (FileNotFoundException e) { 
         e.printStackTrace(); 
      } catch (IOException e) { 
         e.printStackTrace(); 
      } 
   }    
}
UserService.java
package com.tutorialspoint;  

import java.util.List; 
import javax.ws.rs.GET; 
import javax.ws.rs.Path; 
import javax.ws.rs.Produces; 
import javax.ws.rs.core.MediaType;  
@Path("/UserService") 

public class UserService {  
   UserDao userDao = new UserDao();  
   @GET 
   @Path("/users") 
   @Produces(MediaType.APPLICATION_XML) 
   public List<User> getUsers(){ 
      return userDao.getAllUsers(); 
   }  
}
There are two important points to be noted about the main program,

UserService.java

  • The first step is to specify a path for the web service using @Path annotation to the UserService.
  • The second step is to specify a path for the particular web service method using @Path annotation to method of UserService.

Creating the Web.xml configuration File

You need to create a Web xml Configuration file which is an XML file and is used to specify Jersey framework servlet for our application.
web.xml
<?xml version = "1.0" encoding = "UTF-8"?> 
<web-app xmlns:xsi = "http://www.w3.org/2001/XMLSchema-instance"  
   xmlns = "http://java.sun.com/xml/ns/javaee"  
   xsi:schemaLocation="http://java.sun.com/xml/ns/javaee  
   http://java.sun.com/xml/ns/javaee/web-app_3_0.xsd"  
   id = "WebApp_ID" version = "3.0"> 
   <display-name>User Management</display-name> 
   <servlet> 
      <servlet-name>Jersey RESTful Application</servlet-name> 
      <servlet-class>org.glassfish.jersey.servlet.ServletContainer</servletclass> 
      <init-param> 
         <param-name>jersey.config.server.provider.packages</param-name> 
         <param-value>com.tutorialspoint</param-value> 
      </init-param> 
   </servlet> 
   <servlet-mapping> 
      <servlet-name>Jersey RESTful Application</servlet-name> 
      <url-pattern>/rest/*</url-pattern> 
   </servlet-mapping>   
</web-app>

Deploying the Program

Once you are done with creating source and web configuration files, you are ready for this step which is compiling and running your program. To do this, using Eclipse, export your application as a war file and deploy the same in tomcat.
To create a WAR file using eclipse, follow the option File → export → Web → War File and finally select project UserManagement and destination folder. To deploy a war file in Tomcat, place the UserManagement.war in the Tomcat Installation Directory → webapps directory and start the Tomcat.

Running the Program

We are using Postman, a Chrome extension, to test our webservices.
Make a request to UserManagement to get list of all the users. Put http://localhost:8080/UserManagement/rest/UserService/users in POSTMAN with GET request and see the following result.
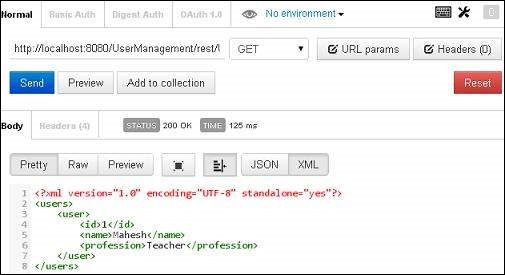
RESTful API, All users Congratulations, you have created your first RESTful Application successfully.

Web Services in java

Web services are one of the most successful implementations of a Service Oriented Architecture, and they usually are presented as a public Api you can use to expand the capabilities of your applications. There's a web service for everything from obtaining songs lyrics to detect faces in an image, to the point that they can be considered the modern version of libraries.
Every application can count on a (moderately fast) internet connection, so the network bottleneck is not a problem like it was 10 years ago, especially when the interchanged data consist of text. But there are a few issues you should be aware of.
First, web services commonly do not present a standard Api: vendor lock-ins are the norm. What if a service is discontinued, or it changes its API? A Facade-like pattern can help here. Another issues is how to test an application which involves web services? Every test that involves a web service uses the network and when you have plenty of tests the suite becomes slower and slower.

Define what you want

When choosing to use a web service in your application, the first task to accomplish is writing an abstraction over it, in a way similar to wrapping an external library. Like libraries, web services APIs are catch-all so wrapping them is useful for hiding everything you won't need: often an interface composed of one or two methods captures any communication towards the service.
For example, if you want to use Google Translate, an interface with the single method:
String translate(String from, String to, String text)
will often suffice. You want to use it for detection instead?
String detect(String text)
You want to find out the lyrics of a song? I did it in my thesis project:
String getLyrics(String artist, String title)
To see if you're segregating interfaces right, try writing a stub which uses an internal prepopulated Map to satisfy requests, and see if it's too difficult because there are tons of methods.
When the abstraction over the web service is defined, you should build a Facade or a Bridge that implements this interface, so that you can swap in an implementation of a different service that does the same thing at will. Note that swapping in an implementation does not happen only if the web service dies: it happens every day in the testing environment (and ease of testing is the sign of good old loose coupling.)
You will usually write integration tests for the Facade, and isolate internal classes that uses it with unit tests that employ mocks and stubs. JUnit satisfies the requirements for both these types of tests, but you may want to define your base test case or helpers.

Throw away SOAP for REST-like (not RESTful)

SOAP and the plethora of WS-* specification are heavy, semantically poor and difficult to use without supporting libraries. Nearly every public web service offers a REST-like API, which is by far simpler to integrate. You can use the REST-like interface to do exploratory manual testing with Curl or even in your browser. Or you can access it from JavaScript other than from Java if you have a web-based interface.
Why the term REST-like? Because many services proclaim to be RESTful but they do not adhere to all six REST principles. But the simplicity is there at least, so we may call them REST-like like Solr does with itself.
REST-like interfaces return native representations instead of XML envelopes which replicate the HTTP semantics with their own headers (we have alreayd 4 TCP/IP levels; why do you think we need another one on top?)
Web services APIs are also resource-oriented instead of being based on Remote Procedure Call, and this paradigm is something the web has employed for twenty years (a proof that it can work.) You're retrieving information in the form of resources, like a list of tweets, a text, facebook status updates, links... Not calling a method.
Web services talk in XML or JSON; you usually can choose between them.

XML

XML as a format is natively supported in Java, by the SAX and DOM APIs (or even XSLT). If you have a JDK, you already have SAX and DOM available.
But please, do not try to define wrapper classes from the XML Schema (JAXB). The idea is generating a bunch of classes from the schema definition (.xsd files) that let you unmarshal XML documents in objects. Why shouldn't we do it?
  • most web services do not define a schema. Pretty good point.
  • Moreover, even if a schema is available you add 10, 20 or 30 classes to your codebase for nothing. Remember, if we have an abstraction the webservice-specific information cannot escape from the particular driver (Bridge implementation) or implementation (Facade). So either you use all the classes defined by JAXB in your implementation for this particular web service, or the majority of them will sit there rolling their thumbs in a nice gen/ folder.
To parse XML returned from a web service you'll probably just need DOM to extract what you want from the response document and throw away the rest:
public class XMLLyricWikiParser implements LyricWikiParser {

 /* (non-Javadoc)
  * @see it.polimi.chansonnier.driver.lyricwiki.LyricWikiParser#getLyrics(java.lang.String)
  */
 public String getLyrics(String xmlContent) {
        try {
            DocumentBuilderFactory dbf = DocumentBuilderFactory.newInstance();
            DocumentBuilder db = dbf.newDocumentBuilder();
            InputSource is = new InputSource();
            is.setCharacterStream(new StringReader(xmlContent.trim()));
            Document doc = db.parse(is);
            doc.getDocumentElement().normalize();
            NodeList lyricsNodes = doc.getElementsByTagName("lyrics");
            Node lyricsNode = lyricsNodes.item(0);
            Element lyricsElement = (Element) lyricsNode;
            return _getTextValue(lyricsElement);
        } catch (Exception e) {
            e.printStackTrace();
            throw new RuntimeException("Malformed document.");
        }
    }

    private static String _getTextValue(Element element)
    {
        return ((Node) element.getChildNodes().item(0)).getNodeValue();
    }

}
For the response string, you can use URL and URLConnection to send HTTP requests without further intermiediate layers:
public class HttpLyricWikiBackend implements LyricWikiBackend {
 private static final String LYRICWIKI_REST_API = "http://lyrics.wikia.com/api.php";

 @Override
 public String getSong(String title, String artist) {
  try {
   URL apiEndPoint = new URL(LYRICWIKI_REST_API 
                                  + "?func=getSong&artist="
                                  + _escape(artist)
                                  + "&song=" 
                                  + _escape(title)
                                  + "&fmt=xml");
         URLConnection connection = apiEndPoint.openConnection();
         BufferedReader in = new BufferedReader(
                                 new InputStreamReader(
                                 connection.getInputStream()));
 
         StringBuilder builder = new StringBuilder();
         String inputLine;
         while ((inputLine = in.readLine()) != null) {
          builder.append(inputLine);
          builder.append("\n");
         }
         in.close();
 
   return builder.toString();
  } catch (MalformedURLException e) {
   throw new RuntimeException("Url of the API is not correct.");
  } catch (IOException e) {
   throw new RuntimeException("Cannot communicate with the server.");
  }
 }

 private String _escape(String phrase) {
  return phrase.replaceAll(" ", "%20");
 }
}
Unfortunately, this is very verbose with regard to dynamic languages. Try XPath if you need more concise code.

JSON

json.org has all you need for JSON parsing in Java. Six classes (six!) which do everything. You download them, put the code in a org/json folder in your class path and you can start parsing responses. Native types are welcome in this small library (like String or Boolean), but JSONObject or JSONArray are also included.

Conclusion

So accessing web services from a Java app, being it web-based or not, it's very simple if you isolate the service, hide everything you don't need and avoid slowing down your test suite by testing in isolation (separating integration tests from unit ones).
Formats are standard and well-supported, with quite long code snippets attached (DOM examples are twenty-lines to extract a field value) but all the wiring code is in the abstraction you create. Web services are just adapters for the ports of your application, but there are so many of them that they are worth considering for inclusion. In this article I presented the simplest approach which you can start with, but that can already take you to great results.

Wednesday, 21 June 2017

RecyclerView with different layouts


One of the new concepts introduced in RecyclerView is the Layout managers. This class basically defines the type of layout which RecyclerView should use. In RecyclerView you can define three types of LayoutManager (s).
  1. LinearLayoutManager – This LayoutManager can be used to display linear lists, they could be vertical or horizontal.
  2. GridLayoutManager – Earlier in android GridView was the only widget to display grids, but now with RecyclerView, GridLayoutManager can be used to display grids.
  3. StaggeredGridLayoutManager – Another great customization is StaggeredGridLayoutManager, this is used to display a staggered grid.
In this Android RecyclerView Tutorial for simplicity I will be using a LinearLayoutManager for displaying a vertical list of items.
Android RecyclerView ViewHolder
The concept of RecyclerView.ViewHolder is same as it was in the ListView. Simply said: when a view goes out of visible area it is kept for recycling. Earlier this was done through the custom view holder pattern. But now with RecyclerView a ViewHolder class is included in the adapter by default. Therefore now its a compulsion for everyone to implement this class. There are many advantages to this approach, like it keeps references to the views in your items, which in turn decreases the overhead of creating new references every time an item is displayed.
Have a look at the object, that I will be using to supply data to ViewHolder:
Also have please have look at the layout where RecyclerView needs to be added:
Android RecyclerView Adapter
In general ListView implementations, the adapters were used to bind views with positions, usually in the getView() method. As developers we used to bind data into it. Here in RecyclerView the concept is same. But now the difference is, that new view holders are placed inside the adapter and the adapter now binds with ViewHolder, instead of views, as in previous adapters. In a way a direct binding between ViewHolder and position is made. To understand the concept mode deeply have a look at my custom implementation of RecyclerView.Adapter :
Android RecyclerView onItemClick Event
Sadly the standard implementation of RecyclerView does not have an onItemClick implementation. Instead they support touch events by adding an OnItemTouchListener through the addOnItemTouchListener method of RecyclerView class.
But I believe the suggested implementation is a little lengthy to implement. Also you may need to detect click events on the views in a RecyclerView item. Which may be a little difficult to implement through the standard OnItemTouchListener. Therefore I have implemented a custom recyclerview onitemclick event.
Here in the above code sample, I defined a custom interface MyClickListener with a method onItemClick, which is used for detecting clicks on the activity. The only drawback of this approach is, that I had to make a static reference to MyClickListener, inside the adapter. Although it may not create any problems, but still to avoid them I suggest you to initialize this interface in onResume() method of your activity.
The above code implementation will detect clicks on the item. If you need to detect clicks on particular views. It can be done simply by modifying the code in DataObjectHolder constructor. The layout for RecyclerView item:
To display visual responses like ripples on screen when a click event is detected add selectableItemBackground resource in the layout (highlighted above). Next have a look at the main activity where all of this code would come into play:
In the above code sample I have defined a basic Android RecyclerView. Where I have also shown, how to add and remove items at run time from the adapter. The good part here is, you need not to worry about animation. They are added and removed with default animation. But the most annoying thing is how to add dividers and spaces between items in RecyclerView?