Thursday 9 August 2018

How to create, deploy and run Java Servlet in Eclipse

In this tutorial, you will learn how to develop a simple Java Servlet using Eclipse IDE. Before moving forward, make sure you have the following pieces of software installed on your computer (clicking on the hyperlink will let you download the corresponding software):
Table of Content:
1. Create Dynamic Web Project
2. Create Servlet class
3. Deploy the servlet
4. Run and test the servlet

1. Create Dynamic Web Project

Servlet is for Java web application, so we need to create a Java EE project first. In Eclipse, make sure the current perspective is Java EE (if not, select Window > Open Perpsective > Java EE, or hold down Ctrl + F8 and select Java EE). Click File > New > Dynamic Web Project, the New Dynamic Web Project appears, enter the following information:
-          Project name: MyFirstServlet
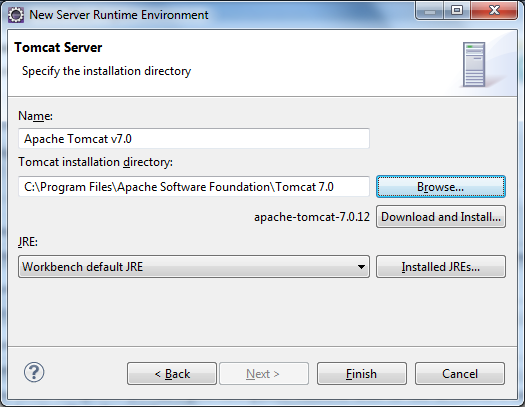
-          Target runtime: Apache Tomcat v7.0. If Apache Tomcat v7.0 is not available in the dropdown list, click New Runtime button. The dialog New Server Runtime Environment appears, select Apache Tomcat v7.0:
new server runtime environment
Click Next. In the next screen, click Browse button to select Tomcat installation directory:
specify tomcat installation directory
Click Finish and Apache Tomcat v7.0 will be added to the dropdown list.

-          Dynamic web module version: 3.0
-          Configuration: Default Configuration for Apache Tomcat v7.0
New Dynamic Web Project screen 1
The configuration we have chosen conforms to Servlet specification version 3.0.
Leave other stuff as default, click Finish. The MyFirstServlet project is created.


2. Create Servlet class

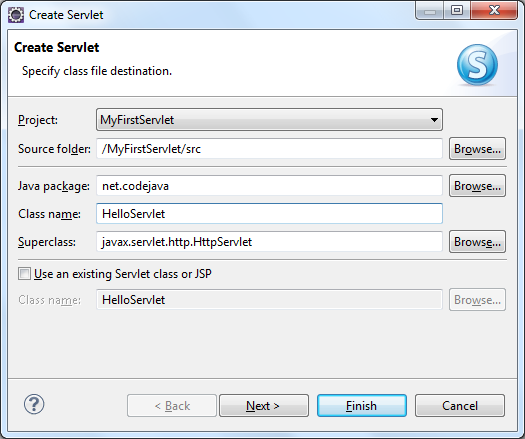
We will create a dead simple servlet class which sends the output “Hello friend!” to client. Click File > New > Servlet, the dialog Create Servlet appears. Enter the following information:
-          Java package: net.codejava
-          Class name: HelloServlet
Create Servlet dialog
The servlet being created has fully qualified name as net.codejava.HelloServlet and extends HttpServlet class. Click Next to move on next screen where we can specify initialization parameters and URL mappings for the servlet:
Create Servlet dialog 2
Leave this form as default. The URL mapping /HelloServlet means that this servlet will be accessible from this URL pattern: http://localhost:8080/MyFirstServlet/HelloServlet Click Next to move on next screen where we can specify which methods we want to inherit from the super class HttpServlet:
Create Servlet dialog 3
By default the two methods doGet() and doPost() are checked. Since we just query the servlet from a HTTP GET method, uncheck the doPost() method. Click Finish, Eclipse creates a Java class which has some skeleton code as below: servlet class code
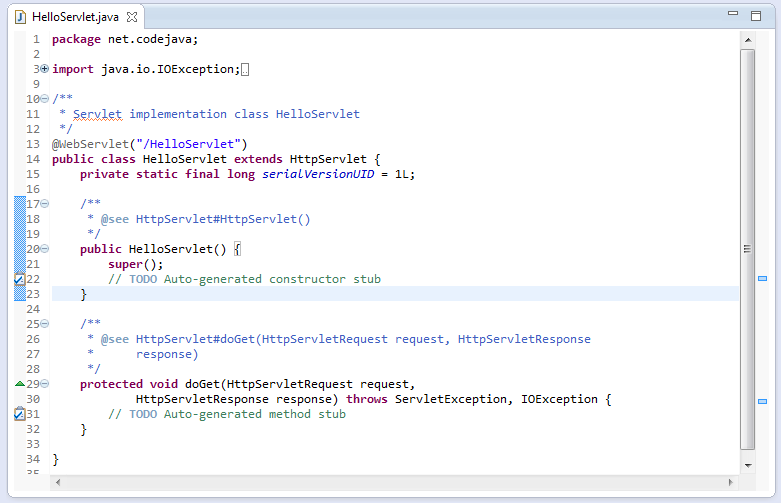
From this skeleton code, we can read out some interesting information as follow:
-          The annotation @WebServlet tells that the annotated class is a servlet. This annotation has been introduced since Servlet API 3.0. The URL mapping /HelloServlet is passed as a parameter of the annotation.
-          HttpServlet class is the base class for all servlets that are serving client’s requests through HTTP.
-          The doGet() method is overridden from the HttpServlet class, since we have chosen to override it in the dialog Create Servlet.
-          The no-argument constructor HelloServlet() is generated to place initialization code. Since we don’t initialize anything, this constructor can be safely deleted.
Add the following line into the doGet() method:
response.getWriter().println("Hello friend!");
So far we have the following code of the servlet HelloServlet:
1
2
3
4
5
6
7
8
9
10
11
12
13
14
15
16
17
18
19
20
21
22
package net.codejava;
import java.io.IOException;
import javax.servlet.ServletException;
import javax.servlet.annotation.WebServlet;
import javax.servlet.http.HttpServlet;
import javax.servlet.http.HttpServletRequest;
import javax.servlet.http.HttpServletResponse;
/**
 * Servlet implementation class HelloServlet
 */
@WebServlet("/HelloServlet")
public class HelloServlet extends HttpServlet {
    private static final long serialVersionUID = 1L;
    protected void doGet(HttpServletRequest request,
            HttpServletResponse response) throws ServletException, IOException {
        response.getWriter().println("Hello friend!");
    }
}
  The doGet() method just simply sends a String “Hello friend!” to the client. And finally, we have the following structure in the Project Explorer view:
project structure
Note that there is no file web.xml is created because that file can be omitted when we are using annotation for Servlet 3.0.

3. Deploy the Servlet

We will deploy the MyFirstServlet application on Tomcat server. Switch to the Servers view by selecting Window > Show View > Servers from Eclipse’s main menu. If there is no server available, click on the link new server wizard…The New Server dialog appears, select Tomcat v7.0 Server as shown in the following screenshot:
new server dialog
Click Next. In the Add and Remove screen, select MyFirstServlet on the left and click Add button to move it to the right, as shown in the following screenshot:
add and remove app
Click Finish, the MyFirstServlet application is now deployed on Tomcat server: Servers view

4. Run and test the servlet

Now, it’s time to start the server and test the servlet. In the Servers view, right click on the server name, and select Start. You should see some output in the Console view, and the server’s status switches from Stopped to Started:
server started
Click Window > Show View > Other…. In the dialog Show View, type “Internal” in the text field then select Internal Web Browser underneath:
show view internal browser
Click OK to open up the view Internal Web Browser. Type the following URL into the address bar (the port number here may be different than yours, depending on how you configured Tomcat): http://localhost:8080/MyFirstServlet/HelloServlet The servlet is invoked and we would see the text “Hello friend!” in the browser: run servlet That’s all for this tutorial! We have learnt how to develop a simple servlet – a basic step in developing Java EE applications.
 

Friday 27 July 2018

java based question

Which of these statements are incorrect?
A. Assignment operators are more efficiently implemented by Java run-time system than their equivalent long forms.
B. Assignment operators run faster than their equivalent long forms.
C. Assignment operators can be used only with numeric and character data type.
D. None

Thursday 26 July 2018

Semaphore in Java


A semaphore controls access to a shared resource through the use of a counter. If the counter is greater than zero, then access is allowed. If it is zero, then access is denied. What the counter is counting are permits that allow access to the shared resource. Thus, to access the resource, a thread must be granted a permit from the semaphore.
Working of semaphore

In general, to use a semaphore, the thread that wants access to the shared resource tries to acquire a permit.
  • If the semaphore’s count is greater than zero, then the thread acquires a permit, which causes the semaphore’s count to be decremented.
  • Otherwise, the thread will be blocked until a permit can be acquired.
  • When the thread no longer needs an access to the shared resource, it releases the permit, which causes the semaphore’s count to be incremented.
  • If there is another thread waiting for a permit, then that thread will acquire a permit at that time.
Java provide Semaphore class in java.util.concurrent package that implements this mechanism, so you don’t have to implement your own semaphores.

Constructors in Semaphore class : There are two constructors in Semaphore class.
Semaphore(int num)
Semaphore(int num, boolean how)

Here, num specifies the initial permit count. Thus, it specifies the number of threads that can access a shared resource at any one time. If it is one, then only one thread can access the resource at any one time. By default, all waiting threads are granted a permit in an undefined order. By setting how to true, you can ensure that waiting threads are granted a permit in the order in which they requested access.

Using Semaphores as Locks(preventing race condition)
We can use a semaphore to lock access to a resource, each thread that wants to use that resource must first call acquire( ) before accessing the resource to acquire the lock. When the thread is done with the resource, it must call release( ) to release lock. Here is an example that demonstrate this:


// java program to demonstrate
// use of semaphores Locks
import java.util.concurrent.*;
//A shared resource/class.
class Shared
{
    static int count = 0;
}
class MyThread extends Thread
{
    Semaphore sem;
    String threadName;
    public MyThread(Semaphore sem, String threadName)
    {
        super(threadName);
        this.sem = sem;
        this.threadName = threadName;
    }
    @Override
    public void run() {
         
        // run by thread A
        if(this.getName().equals("A"))
        {
            System.out.println("Starting " + threadName);
            try
            {
                // First, get a permit.
                System.out.println(threadName + " is waiting for a permit.");
             
                // acquiring the lock
                sem.acquire();
             
                System.out.println(threadName + " gets a permit.");
         
                // Now, accessing the shared resource.
                // other waiting threads will wait, until this
                // thread release the lock
                for(int i=0; i < 5; i++)
                {
                    Shared.count++;
                    System.out.println(threadName + ": " + Shared.count);
         
                    // Now, allowing a context switch -- if possible.
                    // for thread B to execute
                    Thread.sleep(10);
                }
            } catch (InterruptedException exc) {
                    System.out.println(exc);
                }
         
                // Release the permit.
                System.out.println(threadName + " releases the permit.");
                sem.release();
        }
         
        // run by thread B
        else
        {
            System.out.println("Starting " + threadName);
            try
            {
                // First, get a permit.
                System.out.println(threadName + " is waiting for a permit.");
             
                // acquiring the lock
                sem.acquire();
             
                System.out.println(threadName + " gets a permit.");
         
                // Now, accessing the shared resource.
                // other waiting threads will wait, until this
                // thread release the lock
                for(int i=0; i < 5; i++)
                {
                    Shared.count--;
                    System.out.println(threadName + ": " + Shared.count);
         
                    // Now, allowing a context switch -- if possible.
                    // for thread A to execute
                    Thread.sleep(10);
                }
            } catch (InterruptedException exc) {
                    System.out.println(exc);
                }
                // Release the permit.
                System.out.println(threadName + " releases the permit.");
                sem.release();
        }
    }
}
// Driver class
public class SemaphoreDemo
{
    public static void main(String args[]) throws InterruptedException
    {
        // creating a Semaphore object
        // with number of permits 1
        Semaphore sem = new Semaphore(1);
         
        // creating two threads with name A and B
        // Note that thread A will increment the count
        // and thread B will decrement the count
        MyThread mt1 = new MyThread(sem, "A");
        MyThread mt2 = new MyThread(sem, "B");
         
        // stating threads A and B
        mt1.start();
        mt2.start();
         
        // waiting for threads A and B
        mt1.join();
        mt2.join();
         
        // count will always remain 0 after
        // both threads will complete their execution
        System.out.println("count: " + Shared.count);
    }
}

Tuesday 24 July 2018

Locking Objects in java


Object level and Class level locks in Java

Synchronization : Synchronization is a modifier which is used for method and block only. With the help of synchronized modifier we can restrict a shared resource to be accessed only by one thread. When two or more threads need access to shared resources, there is some loss of data i.e. data inconsistency. The process by which we can achieve data consistency between multiple threads it is called Synchronization.
Why do you need Synchronization?
Let us assume if you have two threads that are reading and writing to the same ‘resource’. Suppose there is a variable named as geek, and you want that at one time only one thread should access the variable(atomic way). But Without the synchronized keyword, your thread 1 may not see the changes thread 2 made to geek, or worse, it may only be half changed that cause the data inconsistency problem. This would not be what you logically expect. The tool needed to prevent these errors is synchronization.
In synchronization, there are two types of locks on threads:

Object level lock : Every object in java has a unique lock. Whenever we are using synchronized keyword, then only lock concept will come in the picture. If a thread wants to execute synchronized method on the given object. First, it has to get lock of that object. Once thread got the lock then it is allowed to execute any synchronized method on that object. Once method execution completes automatically thread releases the lock. Acquiring and release lock internally is taken care by JVM and programmer is not responsible for these activities. Lets have a look on the below program to understand the object level lock:

// Java program to illustrate
// Object lock concept
class Pro implements Runnable {
    public void run()
    {
        Lock();
    }
    public void Lock()
    {
        System.out.println(Thread.currentThread().getName());
        synchronized(this)
        {
            System.out.println("in block "
                + Thread.currentThread().getName());
            System.out.println("in block " +
                Thread.currentThread().getName() + " end");
        }
    }
    public static void main(String[] args)
    {
        Pro g = new Pro();
        Thread t1 = new Thread(g);
        Thread t2 = new Thread(g);
        Pro g1 = new Pro();
        Thread t3 = new Thread(g1);
        t1.setName("t1");
        t2.setName("t2");
        t3.setName("t3");
        t1.start();
        t2.start();
        t3.start();
    }
}

Class level lock : Every class in java has a unique lock which is nothing but class level lock. If a thread wants to execute a static synchronized method, then thread requires class level lock. Once a thread got the class level lock, then it is allowed to execute any static synchronized method of that class. Once method execution completes automatically thread releases the lock. Lets look on the below program for better understanding:
  1. // Java program to illustrate class level lock
    class Pro implements Runnable {
        public void run()
        {
            Lock();
        }
     
        public void Lock()
        {
            System.out.println(Thread.currentThread().getName());
            synchronized(Pro.class)
            {
                System.out.println("in block "
                    + Thread.currentThread().getName());
                System.out.println("in block "
                    + Thread.currentThread().getName() + " end");
            }
        }
     
        public static void main(String[] args)
        {
            Pro g1 = new Pro();
            Thread t1 = new Thread(g1);
            Thread t2 = new Thread(g1);
            Pro g2 = new Pro();
            Thread t3 = new Thread(g2);
            t1.setName("t1");
            t2.setName("t2");
            t3.setName("t3");
            t1.start();
            t2.start();
            t3.start();
        }
    }

Saturday 7 July 2018

Design Patterns in Java

Design patterns are well-proved solution for solving the specific problem/task.

Now, a question will be arising in your mind what kind of specific problem? Let me explain by taking an example.
Problem Given:
Suppose you want to create a class for which only a single instance (or object) should be created and that single object can be used by all other classes.
Solution:
Singleton design pattern is the best solution of above specific problem. So, every design pattern has some specification or set of rules for solving the problems. What are those specifications, you will see later in the types of design patterns.

But remember one-thing, design patterns are programming language independent strategies for solving the common object-oriented design problems. That means, a design pattern represents an idea, not a particular implementation.
By using the design patterns you can make your code more flexible, reusable and maintainable. It is the most important part because java internally follows design patterns.
To become a professional software developer, you must know at least some popular solutions (i.e. design patterns) to the coding problems.

Advantage of design pattern:

  1. They are reusable in multiple projects.
  2. They provide the solutions that help to define the system architecture.
  3. They capture the software engineering experiences.
  4. They provide transparency to the design of an application.
  5. They are well-proved and testified solutions since they have been built upon the knowledge and experience of expert software developers.
  6. Design patterns don?t guarantee an absolute solution to a problem. They provide clarity to the system architecture and the possibility of building a better system.

When should we use the design patterns?

We must use the design patterns during the analysis and requirement phase of SDLC (Software Development Life Cycle).
Design patterns ease the analysis and requirement phase of SDLC by providing information based on prior hands-on experiences.

Categorization of design patterns:

Basically, design patterns are categorized into two parts:
  1. Core java (or JSE) Design Patterns.
  2. JEE Design Patterns.

Sunday 3 June 2018

Looking for a Smartphone Under Rs 16,000? Check out the Options


During the past few months, many Smartphones brands have improved their specifications and are ready to offer good phones at affordable prices.
Still, if I say buying a smartphone today is easy, then I hope I am lying. With n-number of options in the market, how is one supposed to make the final decision?
I can’t promise you that the phones I am going to talk about are the perfect smartphones for you (because there isn’t any such thing), but yes, it’ll give you a look into what each top brand in India that is offering in the sub-15k category and might help you decide better.


The Redmi Note 5 Pro comes with a dual rear camera setup.
What is one of the hottest selling phones in the market, the Redmi Note 5 Pro is one of the best smartphones you’ll get in this segment. It’s a loaded gizmo which comes with a dual 12+5-megapixel camera setup that’s more than decent.
This 6-inch device is powered by an octa-core processor coupled with 4GB of RAM and also packs a substantial battery pack of 4,000mAh.
Ones looking for a phone with a great standby time and fast processing can consider the Redmi Note 5 Pro at the price less than $ 200.00.


The Samsung Galaxy J7 DUO comes with AMOLED displays.
Samsung isn’t really known for its mid-range phones. Since the company has a considerable fan following in India, it’s now offering a phone for people looking for something that offers not only brand value but also a lot of utility, that too within budget.
The Samsung J7 DUO comes with  5.5-inch AMOLED display which is considered to be one of the best in this price range. The camera might not be great, but is still good. An octa-core processor and 4 GB RAM keep things running smooth. Not to mention a 3,000 mAh lithium ion battery that can easily give you a day’s standby.


Gionee M7 Lite comes with a 8-megapixel selfie camera.
Remember Gionee? As surprising as it may sound, Gionee was a stellar performer in the mid-range market a couple of years ago. Now it’s back to fight in that segment with the M7 Lite.
The M7 Lite is a good-looking phone that comes with a bezel-less display. It’s got an octa-core processor coupled with 4GB of RAM.
The dual camera phone can be used to deliver some decent clicks, and the 13-megapixel camera on the rear and 8 megapixel camera on front is a surprise package in itself.
The 5000 mAh battery might look underwhelming on paper but can easily last the entire day. The Rs 13000- price tag justifies what Gionee is offering here. However, are you ready to buy a Gionee again?


A full HD display on the 7x is quite vibrant.
When one talks about mid-range phones in India, it is tough to keep a brand like Honor out of the picture.
The Honor 7x was launched with a motive to keep alive the legacy of the successful Honor 6x and it’s done well. The Honor 7x comes with a dual camera setup and a powerful HiSilicon Kirin octa-core processor with 4GB of RAM.
What’s more exciting is that the 7x now comes with the latest Android Oreo!
Apart from the expandable memory, it also offers a 3,340 mAh battery. At Rs 12,999, it’s a bang for your buck phone; only if you don’t have a problem with the user interface which isn’t the most seamless.


Moto G5 Plus is the latest mid-range contender in India.
There’s something about a Moto phone that just attracts a customer. It’s simple yet powerful and comes with the right tools to keep you going.
Stock Android has always been a trademark of Moto devices and the G5 Plus packs enough hardware to keep the user experience smooth.
Camera might not be the forte of this phone but it’s got impressive battery backup thanks to its 3000mAh battery.
At Rs 13,999, the Moto G5 Plus is a sturdy option which is apt for the long haul.

The ZenFone Max Pro from Asus is a powerhouse thanks to its 5,000 mAh battery. It’s the perfect phone for people who hate looking for the charger constantly.
Hardware-wise, it sports a 5.6-inch full HD display and comes with an octa-core processor coupled with 4GB RAM! There’s 64GB of on-board storage which you can always expand.
Dual rear camera and a speaker system loud enough to consume online content are great additions. At $220.00 (4GB), the Zenfone Max checks all the boxes for being an ideal phone with some extra power.
Note : Check the link to know the latest prices and offer provided as these are the prices at the time of compiling this article. This article is to help you in knowing the different products only.