Sunday, 28 May 2017

Java Program Based on Collection

1. Write a Java program to append the specified element to the end of a linked list. 
2. Write a Java program to iterate through all elements in a linked list. 
3. Write a Java program to iterate through all elements in a linked list starting at the specified position.
4. Write a Java program to iterate a linked list in reverse order. 
5. Write a Java program to insert the specified element at the specified position in the linked list. 
6. Write a Java program to insert elements into the linked list at the first and last position. 
7. Write a Java program to insert the specified element at the front of a linked list. 
8. Write a Java program to insert the specified element at the end of a linked list. 
9. Write a Java program to insert some elements at the specified position into a linked list. 
10. Write a Java program to get the first and last occurrence of the specified elements in a linked list.
11. Write a Java program to display the elements and their positions in a linked list. 
12. Write a Java program to remove a specified element from a linked list. 
13. Write a Java program to remove first and last element from a linked list. 
14. Write a Java program to remove all the elements from a linked list. 
15. Write a Java program of swap two elements in an linked list. 
16. Write a Java program to shuffle the elements in a linked list. 
17. Write a Java program to join two linked lists.
18. Write a Java program to clone an linked list to another linked list. 
19. Write a Java program to remove and return the first element of a linked list. 
20. Write a Java program to retrieve but does not remove, the first element of a linked list.

Some Basic java Problem

1. Write a Java program to print 'Hello' on screen and then print your name on a separate line.
2. Write a Java program to print the sum of two numbers.
3. Write a Java program to divide two numbers and print on the screen.
4. Write a Java program to print the result of the following operations.
a. -5 + 8 * 6
b. (55+9) % 9
c. 20 + -3*5 / 8
d. 5 + 15 / 3 * 2 - 8 % 3 
5. Write a Java program that takes two numbers as input and display the product of two numbers.
6. Write a Java program to print the sum (addition), multiply, subtract, divide and remainder of two numbers. 
7. Write a Java program that takes a number as input and prints its multiplication table upto 10.
8. Write a Java program to display the following pattern.
   J    a   v     v  a                                                  
   J   a a   v   v  a a                                                 
J  J  aaaaa   V V  aaaaa                                                
 JJ  a     a   V  a     a 
 
9. Write a Java program to compute the specified expressions and print the output. 

10. Write a Java program to compute a specified formula.
4.0 * (1 - (1.0/3) + (1.0/5) - (1.0/7) + (1.0/9) - (1.0/11)) 

Saturday, 27 May 2017

Functional Programming for Imperative Programmers

This article only covers basic characteristics which separate out Functional languages from Imperative languages. All of following concepts are applicable on all functional languages. After this, select one language and read related tutorial.
We are living in a Matrix, Matrix of Imperative world. e.g. if I ask you write a program to print 1 to 10, the program will be:


for (int i=1; i<=10 ;i++) {
    printf("%d\n", i);
}
In the Matrix of functional programming, there are no for/while loop. Then, how we shall print such numbers? Following is an example in ‘elixir’:
1
Enum.map(1..10, fn(x) -> IO.puts x end)
yes, that’s it. Few functional languages (like ocaml/F#) provide ‘for’ loop which is nothing but synthetic sugar to provide similar functionality, but they do not support complete functionality of a for loop like break, continue.
So, while reading this article, try to understand a completely different world from a completely different perspective. You are going from one Matrix to another Matrix. Remember, there is no real world.
Characteristics of Functional Programming
Purity
Pure code is something which is neither effected by external world nor effects external world. In other word, a function is pure if it provides same output for same set of inputs. e.g.


int sum(int a, int b) {
    return (a+b);
}
now, whatever happens in world, let USA attack Russia, let there be some earth quack, for  a=3 and b=4, the output of function sum will always remain 7. Now lets check another example:

int c = 0;
int sum_avg(int a, int b) {
    if(c == 0)
        return (a + b);
    return (a + b)/2;
}
 
int main_func () {
    int sum = sum_avg(3, 4);
    c = 1;
    int avg = sum_avg(3, 4);
}
Can you predict output of sum_avg function? No. It depends on the value of ‘c’ variable, which is global and can be modified anytime. The function sum_avg will return different values for same set of inputs, so sum_avg function is not pure. If I write sum_avg again as

int sum_avg(int a, int b, int c) {
    if(c == 0)
        return (a + b);
    return (a + b)/2;
}
 
int main_func () {
    int sum = sum_avg(3, 4, 0);
    int avg = sum_avg(3, 4, 1);
}
After this changes, function sum_avg is a pure function. For same set of input, output will always remain same.
The major advantage of Purity is better support for concurrency. Since a pure function does not have any dependency on any external data/function, it can be run in parallel.
Immutability
Now, imagine a function in which you can not modify any variable? Seems funny/impossible/useless? But this is the core of a functional programming language.
Functional programming languages do not support Mutable data structures and this sentence is pure lie. The correct sentence will be Functional programming languages do not encourage use of Mutable data structure.
How it is done? I have one list in which I need to add another element, but list is immutable. Lets see it in Haskell:

addElement a lst = a : lst
 
lst = [1,2,3,4,5]
lst1 = addElement 0 lst
 
lst1
[0,1,2,3,4,5]
Function addElement is used to append a element to a list in beginning.  We have one list lst. It is not possible to mutate this list, but if you want to add a element, call addElement function and store the result in lst1. lst and lst1 represent two independent lists in memory, so no mutation of any variable and yet you have a list which you wanted.
Recursion
As we already discussed, functional languages do not support loops, then how do they perform repetitive task? Try to remember school days, where in initial classes teachers discussed about ‘Recursion’, and then we read somewhere ‘Recursion’ is not good and should not be used. Here Recursion is good and god.
e.g. create a list of 1 to 10 of even numbers.

generateList _ 0 = []
generateList i j = if even i then i : generateList (i+1) (j-1)
                             else generateList (i+1) (j-1)
There are other simple way to do it, but for now lets stick to this version. We wrote a function generateList, which takes two parameters – i (start) and j (end);
Wait, variable with name i and j. This is really not a good practice, right? Not in imperative languages, where functions are lengthy and at some point, you might have to go back to definition to find out what i and j are taken for. In case of functional programming, functions are small and concise. So, taking variables with name i, j, x, y are pretty common.
If i is even, append i and call generateList function again with i+1 and j-1. If j becomes 0, return an empty list.
Output of above program:

generateList 1 10
[2,4,6,8,10]
Tail Call Optimization: TCO is the reason why recursion is not considered evil in functional programming. When a function recursively calls itself, and there is no need to wait for its return, the stack will be replaced. The above answer is not Tail Call optimized, because we are waiting for return value of generateList, so that we can append i.  Remember, just like imperative languages, function language will cause stack overflow with large iteration during recursion, if not TCO optimized.
Here is TCO version of same program.

generateList' _ 0 x = x
generateList' i j x = if even i then generateList' (i+1) (j-1) (i:x)
                                else generateList' (i+1) (j-1) x
Higher Order Functions and Closure support
Higher-order functions are functions that take other functions as their arguments. Ok, so what?
We have some good functions provided by functional languages mainly map, fold, filter. These are your savior from recursion. How? Lets see.
map: map takes one function as a parameter and execute it on each member of list and returns a new list. e.g., lets double each element of a list.

a = [1,2,3,4,5]
dblMe = map (doubleElement) a
 
doubleElement x = 2 * x
Output:

dblMe
[2,4,6,8,10]
So, map is higher order function. Now, lets modify doubleElement and pass a closure instead a complete function.

a = [1,2,3,4,5]
dblMe = map (\ x -> 2 * x) a
Normally all functional languages support Closures.
fold: Fold also takes a function as parameter, a initial value and executes it on each element of list and returns a folded value. e.g Sum of all elements of list.

foldMe = foldl (\ acc x -> acc + x) 0 a
Output:

a = [1,2,3,4,5]
foldMe
15
Fold takes each element from list ‘a’ and pass it to closure. Closure add it to acc, which is initialized with 0. Finally sum of all elements is returned.
filter: Filter also takes a function as parameter (but this function returns Bool value) and executes it on each element of list. If passed function returns True, filter appends element in return list. e.g lets write previous program which generates a list of even numbers in Elixir.
1
1..10 |> Enum.filter(fn x -> rem(x, 2) == 0 end)
Comments and Bugs are invited.

Wednesday, 24 May 2017

Solve the Problem in C,Java,Python-Chef Under Pressure

Chef is about to leave his home and live in a place called The Kingdom. There are N cities in this kingdom, and they are connected by bidirectional roads such that there is exactly one simple path between every 2 cities. The Kingdom is very unusual in that each road that connects two cities is exactly the same length.
The King has a monopoly over all commerce in the city and has very strict rules - he does not allow the citizens of a given city to sell more than one product. So in each city the desperate citizens sell exactly one product. There are K distinct products being sold overall in the Kingdom.
Let's number the cities with integers from 1 to N, and the products from 1 to K. The King lives in the capital city, city B. For each city i, the product that is sold in that city is denoted by F(i).
After Chef has arrived and settled in, he plans to create a new recipe. This will require a certain product P, but this product may not be available in the city he will be living in - he will need to travel to that city to purchase it. Knowing the King's temper and remembering unpleasant incidents between him and the King in the past, Chef wants to stay as far as possible from the capital city (numbered B) during his travels.
Specifically, suppose Chef will be living in the city A. For each city i, let G(i) be the smallest distance between B and any city on the unique path connecting cities A and i. Chef wants to travel to the city C such that:
  • F(C)=P
  • There is no other city D having F(D)=P and G(D) > G(C).
If there are several cities with this property, Chef will choose the one with the smallest number. It is possible that C may equal A, in which case he does not have to travel at all.
Chef has not yet decided which city to live in, nor which recipe to create. You are required to answer several queries for him - if he lives in city A, and requires product P, which city should he travel to in order to purchase it?

Input

The first line of the input contains 2 integers: N and K. The next line contains the number B - the capital city of The Kingdom.
After this, there will be N-1 lines, each containing integers representing two cities, X and Y - indicating that there is a bidirectional road between cities X and Y.
The next N lines contain the description of cities: the i-th line contains a single integer F(i) - the product being sold in city i.
The next line will contain the number of queries, Q. The next Q lines contain 2 integers: A and P: the city Chef will be living in, and the product he requires.

Output

For each of the Q queries, output on separate lines the number of the city from which Chef should buy the given product from, if there is any. Otherwise output -1.

Constraints

  • 1 ≤ K ≤ 100

Subtask 1: [point 20]

  • 1 ≤ N ≤ 100
  • 1 ≤ Q ≤ 100

Subtask 2:[point 80]

  • 1 ≤ N ≤ 104
  • 1 ≤ Q ≤ 104

Example

Input:
8 4
8
3 2
2 1
1 8
8 6
8 7
7 4
4 5
3
2
3
4
1
1
4
4
8
2 1
2 2
2 3
2 4
8 1
8 2
8 3
8 4

Output:
5
2
3
4
5
2
1
4

Tuesday, 23 May 2017

Future of GUI on java - JavaFX

Rich Internet Applications are those web applications which provide similar features and experience as that of desktop applications. They offer a better visual experience when compared to the normal web applications to the users. These applications are delivered as browser plug-ins or as a virtual machine and are used to transform traditional static applications into more enhanced, fluid, animated and engaging applications.
Unlike traditional desktop applications, RIA’s don’t require to have any additional software to run. As an alternative, you should install software such as ActiveX, Java, Flash, depending on the Application.
In an RIA, the graphical presentation is handled on the client side, as it has a plugin that provides support for rich graphics. In a nutshell, data manipulation in an RIA is carried out on the server side, while related object manipulation is carried out on the client side.
We have three main technologies using which we can develop an RIA. These include the following −
  • Adobe Flash
  • Microsoft Silverlight
  • JavaFX

Adobe Flash

This software platform is developed by Adobe Systems and is used in creating Rich Internet Applications. Along with these, you can also build other Applications such as Vector, Animation, Browser Games, Desktop Applications, Mobile Applications and Games, etc.
This is the most commonly used platform for developing and executing RIA’s with a desktop browser penetration rate of 96%.

Microsoft Silverlight

Just like Adobe flash, Microsoft Silverlight is also a software application framework for developing as well as executing Rich Internet Applications. Initially this framework was used for streaming media. The present versions support multimedia, graphics, and animation as well.
This platform is rarely used with a desktop browser penetration rate of 66%.

JavaFX

JavaFX is a Java library using which you can develop Rich Internet Applications. By using Java technology, these applications have a browser penetration rate of 76%.

What is JavaFX?

JavaFX is a Java library used to build Rich Internet Applications. The applications written using this library can run consistently across multiple platforms. The applications developed using JavaFX can run on various devices such as Desktop Computers, Mobile Phones, TVs, Tablets, etc.
To develop GUI Applications using Java programming language, the programmers rely on libraries such as Advanced Windowing Toolkit and Swings. After the advent of JavaFX, these Java programmers can now develop GUI applications effectively with rich content.

Need for JavaFX

To develop Client Side Applications with rich features, the programmers used to depend on various libraries to add features such as Media, UI controls, Web, 2D and 3D, etc. JavaFX includes all these features in a single library. In addition to these, the developers can also access the existing features of a Java library such as Swings.
JavaFX provides a rich set of graphics and media API’s and it leverages the modern Graphical Processing Unit through hardware accelerated graphics. JavaFX also provides interfaces using which developers can combine graphics animation and UI control.
One can use JavaFX with JVM based technologies such as Java, Groovy and JRuby. If developers opt for JavaFX, there is no need to learn additional technologies, as prior knowledge of any of the above-mentioned technologies will be good enough to develop RIA’s using JavaFX.

Features of JavaFX

Following are some of the important features of JavaFX −
  • Written in Java − The JavaFX library is written in Java and is available for the languages that can be executed on a JVM, which include − Java, Groovy and JRuby. These JavaFX applications are also platform independent.
  • FXML − JavaFX features a language known as FXML, which is a HTML like declarative markup language. The sole purpose of this language is to define a user Interface.
  • Scene Builder − JavaFX provides an application named Scene Builder. On integrating this application in IDE’s such as Eclipse and NetBeans, the users can access a drag and drop design interface, which is used to develop FXML applications (just like Swing Drag & Drop and DreamWeaver Applications).
  • Swing Interoperability − In a JavaFX application, you can embed Swing content using the Swing Node class. Similarly, you can update the existing Swing applications with JavaFX features like embedded web content and rich graphics media.
  • Built-in UI controls − JavaFX library caters UI controls using which we can develop a full-featured application.
  • CSS like Styling − JavaFX provides a CSS like styling. By using this, you can improve the design of your application with a simple knowledge of CSS.
  • Canvas and Printing API − JavaFX provides Canvas, an immediate mode style of rendering API. Within the package javafx.scene.canvas it holds a set of classes for canvas, using which we can draw directly within an area of the JavaFX scene. JavaFX also provides classes for Printing purposes in the package javafx.print.
  • Rich set of API’s − JavaFX library provides a rich set of API’s to develop GUI applications, 2D and 3D graphics, etc. This set of API’s also includes capabilities of Java platform. Therefore, using this API, you can access the features of Java languages such as Generics, Annotations, Multithreading, and Lambda Expressions. The traditional Java Collections library was enhanced and concepts like observable lists and maps were included in it. Using these, the users can observe the changes in the data models.
  • Integrated Graphics library − JavaFX provides classes for 2d and 3d graphics.
  • Graphics pipeline − JavaFX supports graphics based on the Hardware-accelerated graphics pipeline known as Prism. When used with a supported Graphic Card or GPU it offers smooth graphics. In case the system does not support graphic card then prism defaults to the software rendering stack.

Layout available in JavaFX

After constructing all the required nodes in a scene, we will generally arrange them in order.
This arrangement of the components within the container is called the Layout of the container. We can also say that we followed a layout as it includes placing all the components at a particular position within the container.
JavaFX provides several predefined layouts such as HBox, VBox, Border Pane, Stack Pane, Text Flow, Anchor Pane, Title Pane, Grid Pane, Flow Panel, etc.
Each of the above mentioned layout is represented by a class and all these classes belongs to the package javafx.layout. The class named Pane is the base class of all the layouts in JavaFX.

Creating a Layout

To create a layout, you need to −
  • Create node.
  • Instantiate the respective class of the required layout.
  • Set the properties of the layout.
  • Add all the created nodes to the layout.

Creating Nodes

First of all, create the required nodes of the JavaFX application by instantiating their respective classes.
For example, if you want to have a text field and two buttons namely, play and stop in a HBox layout - you will have to initially create those nodes as shown in the following code block −
//Creating a text field 
TextField textField = new TextField();       

//Creating the play button 
Button playButton = new Button("Play");       

//Creating the stop button 
Button stopButton = new Button("stop");

Instantiating the Respective Class

After creating the nodes (and completing all the operations on them), instantiate the class of the required layout.
For Example, if you want to create a Hbox layout, you need to instantiate this class as follows.
HBox hbox = new HBox();

Setting the Properties of the Layout

After instantiating the class, you need to set the properties of the layout using their respective setter methods.
For example − If you want to set space between the created nodes in the HBox layout, then you need to set value to the property named spacing. This can be done by using the setter method setSpacing() as shown below −
hbox.setSpacing(10);

Adding the Shape Object to the Group

Finally, you need to add the object of the shape to the group by passing it as a parameter of the constructor as shown below.
//Creating a Group object  
Group root = new Group(line);

Layout Panes

Following are the various Layout panes (classes) provided by JavaFX. These classes exist in the package javafx.scene.layout.
S.No Shape & Description
1 HBox The HBox layout arranges all the nodes in our application in a single horizontal row.
The class named HBox of the package javafx.scene.layout represents the text horizontal box layout.
2 VBox The VBox layout arranges all the nodes in our application in a single vertical column.
The class named VBox of the package javafx.scene.layout represents the text Vertical box layout.
3 BorderPane The Border Pane layout arranges the nodes in our application in top, left, right, bottom and center positions.
The class named BorderPane of the package javafx.scene.layout represents the border pane layout.
4 StackPane The stack pane layout arranges the nodes in our application on top of another just like in a stack. The node added first is placed at the bottom of the stack and the next node is placed on top of it.
The class named StackPane of the package javafx.scene.layout represents the stack pane layout.
5 TextFlow The Text Flow layout arranges multiple text nodes in a single flow.
The class named TextFlow of the package javafx.scene.layout represents the text flow layout.
6 AnchorPane The Anchor pane layout anchors the nodes in our application at a particular distance from the pane.
The class named AnchorPane of the package javafx.scene.layout represents the Anchor Pane layout.
7 TilePane The Tile Pane layout adds all the nodes of our application in the form of uniformly sized tiles.
The class named TilePane of the package javafx.scene.layout represents the TilePane layout.
8 GridPane The Grid Pane layout arranges the nodes in our application as a grid of rows and columns. This layout comes handy while creating forms using JavaFX.
The class named GridPane of the package javafx.scene.layout represents the GridPane layout.
9 FlowPane The flow pane layout wraps all the nodes in a flow. A horizontal flow pane wraps the elements of the pane at its height, while a vertical flow pane wraps the elements at its width.
The class named FlowPane of the package javafx.scene.layout represents the Flow Pane layout.

Creating a JavaFX Application

JavaFX Application Structure

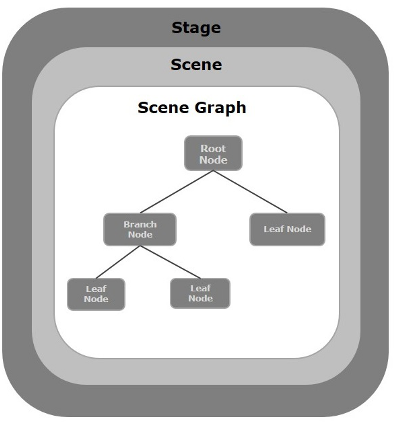
In general, a JavaFX application will have three major components namely Stage, Scene and Nodes as shown in the following diagram.
JavaFX Application Structure

Stage

A stage (a window) contains all the objects of a JavaFX application. It is represented by Stage class of the package javafx.stage. The primary stage is created by the platform itself. The created stage object is passed as an argument to the start() method of the Application class (explained in the next section).
A stage has two parameters determining its position namely Width and Height. It is divided as Content Area and Decorations (Title Bar and Borders).
There are five types of stages available −
  • Decorated
  • Undecorated
  • Transparent
  • Unified
  • Utility
You have to call the show() method to display the contents of a stage.

Scene

A scene represents the physical contents of a JavaFX application. It contains all the contents of a scene graph. The class Scene of the package javafx.scene represents the scene object. At an instance, the scene object is added to only one stage.
You can create a scene by instantiating the Scene Class. You can opt for the size of the scene by passing its dimensions (height and width) along with the root node to its constructor.

Scene Graph and Nodes

A scene graph is a tree-like data structure (hierarchical) representing the contents of a scene. In contrast, a node is a visual/graphical object of a scene graph.
A node may include −
  • Geometrical (Graphical) objects (2D and 3D) such as − Circle, Rectangle, Polygon, etc.
  • UI Controls such as − Button, Checkbox, Choice Box, Text Area, etc.
  • Containers (Layout Panes) such as Border Pane, Grid Pane, Flow Pane, etc.
  • Media elements such as Audio, Video and Image Objects.
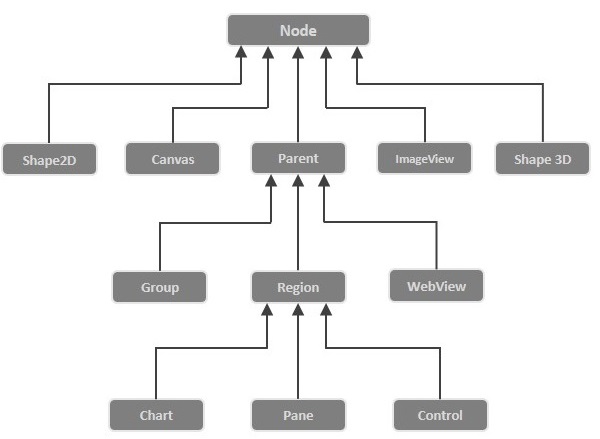
The Node Class of the package javafx.scene represents a node in JavaFX, this class is the super class of all the nodes.
As discussed earlier a node is of three types −
  • Root Node − The first Scene Graph is known as the Root node.
  • Branch Node/Parent Node − The node with child nodes are known as branch/parent nodes. The abstract class named Parent of the package javafx.scene is the base class of all the parent nodes, and those parent nodes will be of the following types −
    • Group − A group node is a collective node that contains a list of children nodes. Whenever the group node is rendered, all its child nodes are rendered in order. Any transformation, effect state applied on the group will be applied to all the child nodes.
    • Region − It is the base class of all the JavaFX Node based UI Controls, such as Chart, Pane and Control.
    • WebView − This node manages the web engine and displays its contents.
  • Leaf Node − The node without child nodes is known as the leaf node. For example, Rectangle, Ellipse, Box, ImageView, MediaView are examples of leaf nodes.
It is mandatory to pass the root node to the scene graph. If the Group is passed as root, all the nodes will be clipped to the scene and any alteration in the size of the scene will not affect the layout of the scene.

Creating a JavaFX Application

To create a JavaFX application, you need to instantiate the Application class and implement its abstract method start(). In this method, we will write the code for the JavaFX Application.

Application Class

The Application class of the package javafx.application is the entry point of the application in JavaFX. To create a JavaFX application, you need to inherit this class and implement its abstract method start(). In this method, you need to write the entire code for the JavaFX graphics
In the main method, you have to launch the application using the launch() method. This method internally calls the start() method of the Application class as shown in the following program.
public class JavafxSample extends Application {  
   @Override     
   public void start(Stage primaryStage) throws Exception { 
      /* 
      Code for JavaFX application. 
      (Stage, scene, scene graph) 
      */       
   }         
   public static void main(String args[]){           
      launch(args);      
   } 
} 
Within the start() method, in order to create a typical JavaFX application, you need to follow the steps given below −
  • Prepare a scene graph with the required nodes.
  • Prepare a Scene with the required dimensions and add the scene graph (root node of the scene graph) to it.
  • Prepare a stage and add the scene to the stage and display the contents of the stage.

Preparing the Scene Graph

As per your application, you need to prepare a scene graph with required nodes. Since the root node is the first node, you need to create a root node. As a root node, you can choose from the Group, Region or WebView.
Group − A Group node is represented by the class named Group which belongs to the package javafx.scene, you can create a Group node by instantiating this class as shown below.
Group root = new Group();
The getChildren() method of the Group class gives you an object of the ObservableList class which holds the nodes. We can retrieve this object and add nodes to it as shown below.
//Retrieving the observable list object 
ObservableList list = root.getChildren(); 
       
//Setting the text object as a node  
list.add(NodeObject); 
We can also add Node objects to the group, just by passing them to the Group class and to its constructor at the time of instantiation, as shown below.
Group root = new Group(NodeObject);
Region − It is the Base class of all the JavaFX Node-based UI Controls, such as −
  • Chart − This class is the base class of all the charts and it belongs to the package javafx.scene.chart.
    This class has two sub classes, which are − PieChart and XYChart. These two in turn have subclasses such as AreaChart, BarChart, BubbleChart, etc. used to draw different types of XY-Plane Charts in JavaFX.
    You can use these classes to embed charts in your application.
  • Pane − A Pane is the base class of all the layout panes such as AnchorPane, BorderPane, DialogPane, etc. This class belong to a package that is called as − javafx.scene.layout.
    You can use these classes to insert predefined layouts in your application.
  • Control − It is the base class of the User Interface controls such as Accordion, ButtonBar, ChoiceBox, ComboBoxBase, HTMLEditor, etc. This class belongs to the package javafx.scene.control.
    You can use these classes to insert various UI elements in your application.
In a Group, you can instantiate any of the above-mentioned classes and use them as root nodes, as shown in the following program.
//Creating a Stack Pane 
StackPane pane = new StackPane();       
       
//Adding text area to the pane  
ObservableList list = pane.getChildren(); 
list.add(NodeObject);
WebView − This node manages the web engine and displays its contents.
Following is a diagram representing the node class hierarchy of JavaFX.
WebView

Preparing the Scene

A JavaFX scene is represented by the Scene class of the package javafx.scene. You can create a Scene by instantiating this class as shown in the following cod block.
While instantiating, it is mandatory to pass the root object to the constructor of the scene class.
Scene scene = new Scene(root);
You can also pass two parameters of double type representing the height and width of the scene as shown below.
Scene scene = new Scene(root, 600, 300);

Preparing the Stage

This is the container of any JavaFX application and it provides a window for the application. It is represented by the Stage class of the package javafx.stage. An object of this class is passed as a parameter of the start() method of the Application class.
Using this object, you can perform various operations on the stage. Primarily you can perform the following −
  • Set the title for the stage using the method setTitle().
  • Attach the scene object to the stage using the setScene() method.
  • Display the contents of the scene using the show() method as shown below.
//Setting the title to Stage. 
primaryStage.setTitle("Sample application"); 
       
//Setting the scene to Stage 
primaryStage.setScene(scene); 
       
//Displaying the stage 
primaryStage.show();

Lifecycle of JavaFX Application

The JavaFX Application class has three life cycle methods, which are −
  • start() − The entry point method where the JavaFX graphics code is to be written.
  • stop() − An empty method which can be overridden, here you can write the logic to stop the application.
  • init() − An empty method which can be overridden, but you cannot create stage or scene in this method.
In addition to these, it provides a static method named launch() to launch JavaFX application.
Since the launch() method is static, you need to call it from a static context (main generally). Whenever a JavaFX application is launched, the following actions will be carried out (in the same order).
  • An instance of the application class is created.
  • Init() method is called.
  • The start() method is called.
  • The launcher waits for the application to finish and calls the stop() method.

Terminating the JavaFX Application

When the last window of the application is closed, the JavaFX application is terminated implicitly. You can turn this behavior off by passing the Boolean value “False” to the static method setImplicitExit() (should be called from a static context).
You can terminate a JavaFX application explicitly using the methods Platform.exit() or System.exit(int).

Example 1 – Creating an Empty Window

This section teaches you how to create a JavaFX sample application which displays an empty window. Following are the steps −

Step 1: Creating a Class

Create a Java class and inherit the Application class of the package javafx.application and implement the start() method of this class as follows.
public class JavafxSample extends Application {  
   @Override     
   public void start(Stage primaryStage) throws Exception {      
   }    
} 

Step 2: Creating a Group Object

In the start() method creates a group object by instantiating the class named Group, which belongs to the package javafx.scene, as follows.
Group root = new Group();

Step 3: Creating a Scene Object

Create a Scene by instantiating the class named Scene which belongs to the package javafx.scene. To this class, pass the Group object (root), created in the previous step.
In addition to the root object, you can also pass two double parameters representing height and width of the screen along with the object of the Group class as follows.
Scene scene = new Scene(group,600, 300);

Step 4: Setting the Title of the Stage

You can set the title to the stage using the setTitle() method of the Stage class. The primaryStage is a Stage object which is passed to the start method of the scene class, as a parameter.
Using the primaryStage object, set the title of the scene as Sample Application as shown below.
primaryStage.setTitle("Sample Application");

Step 5: Adding Scene to the Stage

You can add a Scene object to the stage using the method setScene() of the class named Stage. Add the Scene object prepared in the previous steps using this method as shown below.
primaryStage.setScene(scene);

Step 6: Displaying the Contents of the Stage

Display the contents of the scene using the method named show() of the Stage class as follows.
primaryStage.show();

Step 7: Launching the Application

Launch the JavaFX application by calling the static method launch() of the Application class from the main method as follows.
public static void main(String args[]){   
   launch(args);      
}  

Example

The following program generates an empty JavaFX window. Save this code in a file with the name JavafxSample.java
import javafx.application.Application; 
import javafx.scene.Group; 
import javafx.scene.Scene; 
import javafx.scene.paint.Color; 
import javafx.stage.Stage;  

public class JavafxSample extends Application { 
   @Override     
   public void start(Stage primaryStage) throws Exception {            
      //creating a Group object 
      Group group = new Group(); 
       
      //Creating a Scene by passing the group object, height and width   
      Scene scene = new Scene(group ,600, 300); 
      
      //setting color to the scene 
      scene.setFill(Color.BROWN);  
      
      //Setting the title to Stage. 
      primaryStage.setTitle("Sample Application"); 
   
      //Adding the scene to Stage 
      primaryStage.setScene(scene); 
       
      //Displaying the contents of the stage 
      primaryStage.show(); 
   }    
   public static void main(String args[]){          
      launch(args);     
   }         
} 
Compile and execute the saved java file from the command prompt using the following commands.
javac JavafxSample.java 
java JavafxSample
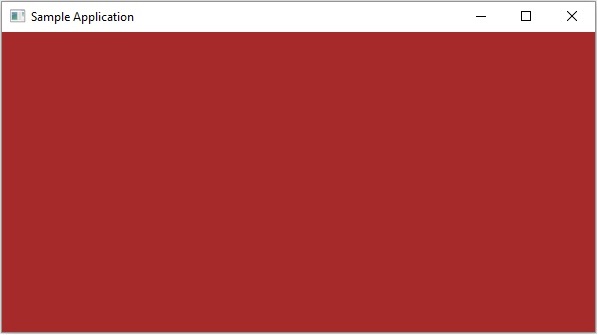
On executing, the above program generates a JavaFX window as shown below.
Sample Application Plain

Example 2 – Drawing a Straight Line

In the previous example, we have seen how to create an empty stage, now in this example let us try to draw a straight line using the JavaFX library.
Following are the steps −

Step 1: Creating a Class

Create a Java class and inherit the Application class of the package javafx.application and implement the start() method of this class as follows.
public class DrawingLine extends Application {
   @Override     
   public void start(Stage primaryStage) throws Exception {     
   }    
} 

Step 2: Creating a Line

You can create a line in JavaFX by instantiating the class named Line which belongs to a package javafx.scene.shape, instantiate this class as follows.
//Creating a line object         
Line line = new Line();

Step 3: Setting Properties to the Line

Specify the coordinates to draw the line on an X-Y plane by setting the properties startX, startY, endX and endY, using their respective setter methods as shown in the following code block.
line.setStartX(100.0); 
line.setStartY(150.0); 
line.setEndX(500.0); 
line.setEndY(150.0);

Step 4: Creating a Group Object

In the start() method create a group object by instantiating the class named Group, which belongs to the package javafx.scene.
Pass the Line (node) object, created in the previous step, as a parameter to the constructor of the Group class, in order to add it to the group as follows −
Group root = new Group(line);

Step 5: Creating a Scene Object

Create a Scene by instantiating the class named Scene which belongs to the package javafx.scene. To this class, pass the Group object (root) that was created in the previous step.
In addition to the root object, you can also pass two double parameters representing height and width of the screen along with the object of the Group class as follows.
Scene scene = new Scene(group ,600, 300);

Step 6: Setting the Title of the Stage

You can set the title to the stage using the setTitle() method of the Stage class. The primaryStage is a Stage object which is passed to the start method of the scene class, as a parameter.
Using the primaryStage object, set the title of the scene as Sample Application as follows.
primaryStage.setTitle("Sample Application");

Step 7: Adding Scene to the Stage

You can add a Scene object to the stage using the method setScene() of the class named Stage. Add the Scene object prepared in the previous steps using this method as follows.
primaryStage.setScene(scene);

Step 8: Displaying the Contents of the Stage

Display the contents of the scene using the method named show() of the Stage class as follows.
primaryStage.show();

Step 9: Launching the Application

Launch the JavaFX application by calling the static method launch() of the Application class from the main method as follows.
public static void main(String args[]){   
   launch(args);      
} 

Example

The following program shows how to generate a straight line using JavaFX. Save this code in a file with the name JavafxSample.java.
import javafx.application.Application; 
import javafx.scene.Group; 
import javafx.scene.Scene; 
import javafx.scene.shape.Line; 
import javafx.stage.Stage;  

public class DrawingLine extends Application{ 
   @Override 
   public void start(Stage stage) { 
      //Creating a line object 
      Line line = new Line(); 
         
      //Setting the properties to a line 
      line.setStartX(100.0); 
      line.setStartY(150.0); 
      line.setEndX(500.0); 
      line.setEndY(150.0); 
         
      //Creating a Group 
      Group root = new Group(line); 
         
      //Creating a Scene 
      Scene scene = new Scene(root, 600, 300); 
         
      //Setting title to the scene 
      stage.setTitle("Sample application"); 
         
      //Adding the scene to the stage 
      stage.setScene(scene); 
         
      //Displaying the contents of a scene 
      stage.show(); 
   }      
   public static void main(String args[]){ 
      launch(args); 
   } 
} 
Compile and execute the saved java file from the command prompt using the following commands.
javac DrawingLine.java 
java DrawingLine
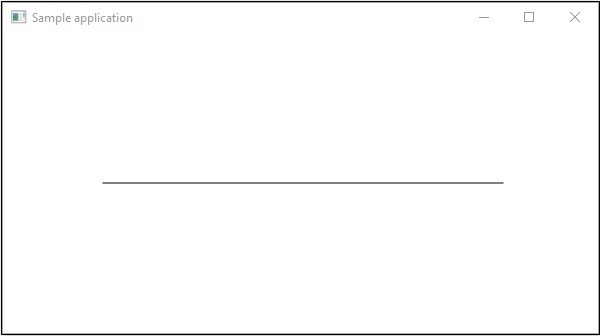
On executing, the above program generates a JavaFX window displaying a straight line as shown below.
Drawing Line

Example 3 – Displaying Text

We can also embed text in JavaFX scene. This example shows how to embed text in JavaFX.
Following are the steps −

Step 1: Creating a Class

Create a Java Class and inherit the Application class of the package javafx.application and implement the start() method of this class as follows.
public class DrawingLine extends Application {  
   @Override     
   public void start(Stage primaryStage) throws Exception {     
   } 
}

Step 2: Embedding Text

You can embed text in to a JavaFX scene by instantiating the class named Text which belongs to a package javafx.scene.shape, instantiate this class.
To the constructor of this class pass the text to be embedded in String format as follows.
//Creating a Text object 
Text text = new Text("Welcome to Tutorialspoint");

Step 3: Setting the Font

You can set font to the text using the setFont() method of the Text class. This method accepts a font object as parameters. Set the font of the given text to 45 as shown below.
//Setting font to the text 
text.setFont(new Font(45)); 

Step 4: Setting the Position of the Text

You can set the position of the text on the X-Y plane by setting the X,Y coordinates using the respective setter methods setX() and setY() as follows.
//setting the position of the text 
text.setX(50); 
text.setY(150); 

Step 5: Setting Properties to the Line

Specify the coordinates to draw the line on an X-Y plane by setting the properties startX, startY, endX and endY, using their respective setter methods as shown in the following code block.
line.setStartX(100.0); 
line.setStartY(150.0); 
line.setEndX(500.0); 
line.setEndY(150.0); 

Step 6: Creating a Group Object

In the start() method, create a group object by instantiating the class named Group, which belongs to the package javafx.scene.
Pass the Text (node) object, created in the previous step, as a parameter to the constructor of the Group class, in order to add it to the group as follows −
Group root = new Group(text)

Step 7: Creating a Scene Object

Create a Scene by instantiating the class named Scene which belongs to the package javafx.scene. To this class, pass the Group object (root), created in the previous step.
In addition to the root object, you can also pass two double parameters representing height and width of the screen along with the object of the Group class as follows.
Scene scene = new Scene(group ,600, 300);

Step 8: Setting the Title of the Stage

You can set the title to the stage using the setTitle() method of the Stage class. The primaryStage is a Stage object which is passed to the start method of the scene class, as a parameter.
Using the primaryStage object, set the title of the scene as Sample Application as shown below.
primaryStage.setTitle("Sample Application");

Step 9: Adding Scene to the Stage

You can add a Scene object to the stage using the method setScene() of the class named Stage. Add the Scene object prepared in the previous steps using this method as follows.
primaryStage.setScene(scene);

Step 10: Displaying the Contents of the Stage

Display the contents of the scene using the method named show() of the Stage class as follows.
primaryStage.show();

Step 11: Launching the Application

Launch the JavaFX application by calling the static method launch() of the Application class from the main method as follows.
public static void main(String args[]){ 
   launch(args);      
} 

Example

Following is the program to display text using JavaFX. Save this code in a file with name DisplayingText.java.
import javafx.application.Application; 
import javafx.collections.ObservableList; 
import javafx.scene.Group; 
import javafx.scene.Scene; 
import javafx.stage.Stage; 
import javafx.scene.text.Font; 
import javafx.scene.text.Text; 
         
public class DisplayingText extends Application { 
   @Override 
   public void start(Stage stage) {       
      //Creating a Text object 
      Text text = new Text(); 
       
      //Setting font to the text 
      text.setFont(new Font(45)); 
       
      //setting the position of the text 
      text.setX(50); 
      text.setY(150);          
      
      //Setting the text to be added. 
      text.setText("Welcome to the World of JavaFX"); 
         
      //Creating a Group object  
      Group root = new Group(); 
       
      //Retrieving the observable list object 
      ObservableList list = root.getChildren(); 
       
      //Setting the text object as a node to the group object 
      list.add(text);       
               
      //Creating a scene object 
      Scene scene = new Scene(root, 600, 300); 
       
      //Setting title to the Stage 
      stage.setTitle("Sample Application"); 
         
      //Adding scene to the stage 
      stage.setScene(scene); 
         
      //Displaying the contents of the stage 
      stage.show(); 
   }   
   public static void main(String args[]){ 
      launch(args); 
   } 
} 
Compile and execute the saved java file from the command prompt using the following commands.
javac DisplayingText.java 
java DisplayingText
On executing, the above program generates a JavaFX window displaying text as shown below.